Paint blistering and bubbling on ceilings and walls are common problems for homeowners and professionals alike during or after painting. They don't look presentable and can mean underlying wall or ceiling structure issues. Knowing the reasons, how to spot the signs, and how to paint a wall to prevent and repair paint blistering and bubbling will give you a smooth, stunning surface.
Below in the article you would get to know more about the bubbling on walls and ceilings, the common causes of it, and ways to fix it:
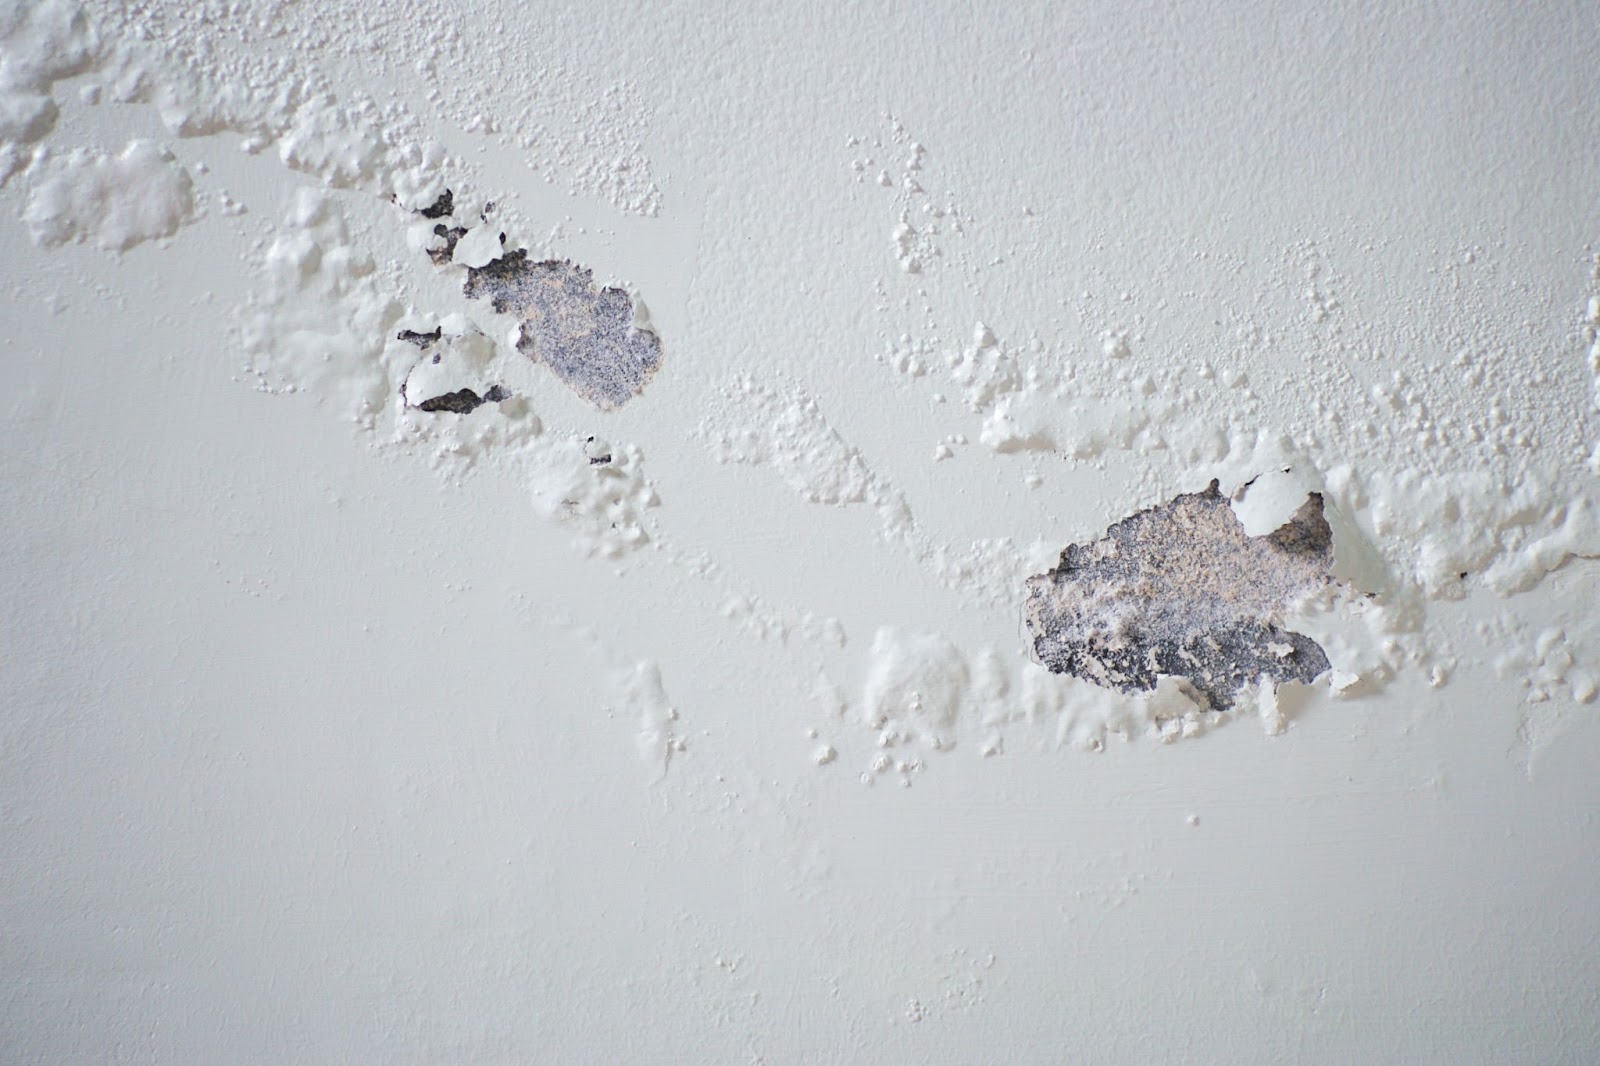
What Is Paint Blistering And Bubbling?
Blistering occurs when air or water penetrates beneath the paint's surface, causing cracks on the painted surface. These blisters may take the form of small or large paint bubbles that appear detached from the surface below. Likewise, bubbling occurs when air or water forms tiny, spherical, or irregular bubbles in the paint coating.
Blistering and bubbling may be seen on walls, ceilings, and even the outside of buildings. Although the problems may arise in both fresh and aged paint finishes, they are more likely to occur if the surface preparation is inadequate or if the painting conditions are unsuitable in the environment.
Common Causes Of Paint Blistering And Bubbling On Walls
To prevent and repair paint bubbling and blistering, it's vital to know the most likely causes.
1. Moisture And Humidity
The leading cause of paint bubbling and blistering is humidity or moisture. Paint can be affected by excess moisture behind walls, producing bubbles in painted walls. Wall primers can help prevent excess moisture behind walls, which produces bubbles in painted walls.
It's particularly common in basements, bathrooms, and kitchen spaces, which are naturally moist environments. When water becomes trapped between the paint surface and the wall, it causes bubbles in the paint. Due to high humidity and shower steam, bathroom ceiling bubbling is standard.
2. Poor Surface Preparation
Poor surface preparation is another serious cause of paint bubbles and blisters. Paint will lift or bubble if the wall or ceiling is not thoroughly cleaned and is contaminated with dust, grease, or mildew. Clean and prepare the surface properly before painting. This involves washing the walls with soap and water, clearing mildew, and drying the surface. Using wall putty can create a smooth and even base for the paint application.
3. Heat And Sunlight Exposure
Extended sun exposure and heat may lead to blistering or bubbling of the paint, particularly on exterior wall paint. Sun heat dries the paint too rapidly, locking air underneath its surface. This tends to occur frequently with exterior wall paints exposed to direct sunlight for long periods. If you're painting outside walls, try to paint at times other than the middle of the day. Use good outdoor paint that will dry thoroughly in the sun.
4. Use Of Low-Quality paints
Low-quality paints tend to be less long-lasting and are susceptible to problems such as blistering and bubbling. Poorly adhering paints or those lacking moisture resistance can bubble and peel easily. Use high-quality paints like Berger that are formulated for these particular surfaces and environmental conditions.
5. Selecting The Incorrect Roller Cover
The wrong roller cover, which is too rough or soft for the surface, can cause paint bubbling. When the roller is painted to leave an uneven coat, air bubbles form in the paint. Choose the proper roller cover depending on the surface and paint you are dealing with. For even surfaces, utilise a roller with a short nap; use one with a longer nap for rough surfaces.
6. Structural Movement Causing Substrate Movement
Buildings may shift and settle over the years. This movement may cause walls and ceilings to crack or shift, which then causes the paint to bubble. This is usually noticeable in older buildings or areas with less stable ground. Tackle any structural problems before painting. If you spot cracks in the walls or ceiling, fix them before painting to prevent paint damage.
Signs Of Paint Bubbling And Blistering
Spotting the indicators of bubbling and blistering is crucial so you can have it remedied as soon as possible.
- Bubbles In paintwork: Small or big bubbles that appear on the paint surface are an obvious indicator of blistering or bubbling.
- Paint Bubbling: You might notice that areas of the paint look as though they have paint, usually a round or oval bump, where the paint has peeled off the surface.
- Air Bubbles On painted Walls: This can happen if the paint is painted in heavy coats and the surface hasn't been properly prepped. The bubbles usually develop between coats of paint.
- Bubbles In wall paint From moisture: You might notice that areas of the paint look as though they have paint bubbles, usually a round or oval bump, where the paint has peeled off the surface.
How To Prevent Paint Blistering And Bubbling
Here’s is how you can prevent paint from blistering and bubbling:
- Avoid air bubbles in paint when rolling by using a high-quality roller and applying even pressure.
- Prevent air bubbles in ceiling paint by thinning paint slightly if it is too thick and rolling slowly.
- Address paint bubbling on walls from water damage by fixing leaks or moisture sources first.
- Ensure proper surface drying after water exposure before repainting to stop bubbling.
- Use a smooth application of primer to create an even base and seal the surface.
- Apply primer thinly and evenly with a brush or roller to avoid trapping air.
- Sand the surface lightly before priming to remove imperfections and enhance adhesion.
- Choose a primer suited for the surface type to prevent blistering.
- Allow primer to dry fully before painting to reduce moisture-related bubbling.
- Maintain good ventilation during painting to help the paint cure properly.
How To fix Paint Blistering And Bubbling
There are a few ways through which you can fix paint blistering and bubbling:
1. Identifying The Cause
Before repairing the paint, you need to find the cause of the problem. Look for evidence of moist paint, inadequate surface preparation, or building movement. This will guide you in selecting the correct solution.
2. Removing Damaged paint
The first step in fixing the bubbling paint is to remove the damaged paint. Use a scraper or putty unpainted to peel off the bubbled paint carefully. Be sure to obliterate the loose paint to prevent the issue from worsening.
- Sanding the Wall, if Required: Once you've removed the bubbled paint, use sandpaper to smooth the paint's surface. Sanding helps remove any rough areas and creates a better surface for the new paint to adhere to.
3. Ensuring Proper Surface Preparation
Before repainting, make sure the surface is thoroughly clean and dry. If moisture has accumulated, let the wall dry out before proceeding. You might have to fix any underlying problems, like leaks or humidity, to avoid future issues.
- Applying the Primer: After preparing the surface, apply a coat of primer. This seals the surface and offers a smooth foundation for the paint.
4. Reapplying Paint Properly
paint a new coat of paint using the proper technique. Use a high-quality paint suitable for the surface and climate. Adhere to the application and drying guidelines from the manufacturer to prevent air bubbles in the paint on the wall.
Conclusion
Paint bubbling and blistering are frustrating issues, but they can be prevented with proper knowledge and techniques. By fixing paint on wall, using top-quality materials, and preparing the surface properly, you can achieve a flawless paint job without worrying about bubbles in the paint.